If you have a staircase in your home, it’s important to have a handrail to help ensure the safety of those using the stairs. Installing a handrail may seem like a daunting task, but with the right tools and some basic knowledge, it can be done relatively easily. In this article, we’ll go over the steps involved in how to install a handrail on a wall.
Read Also: How to Build a Garden Wooden Shed?
Steps, and Tools Needed to Install a Staircase Handrail
- Handrail
- Handrail brackets
- Drill
- Screws
- Screwdriver
- Stud finder
- Level
- Measuring tape
- Pencil
- Sandpaper
1. Measure and Mark
First, you need to measure the length of the staircase where you want to install the handrail. Once you have this measurement, you can purchase a handrail that is the appropriate length. Next, use a pencil and a level to mark the location where you want to install the handrail.
2. Locate the Studs
Using a stud finder, locate the studs behind the wall where you want to install the handrail. Mark the location of the studs on the wall with a pencil.
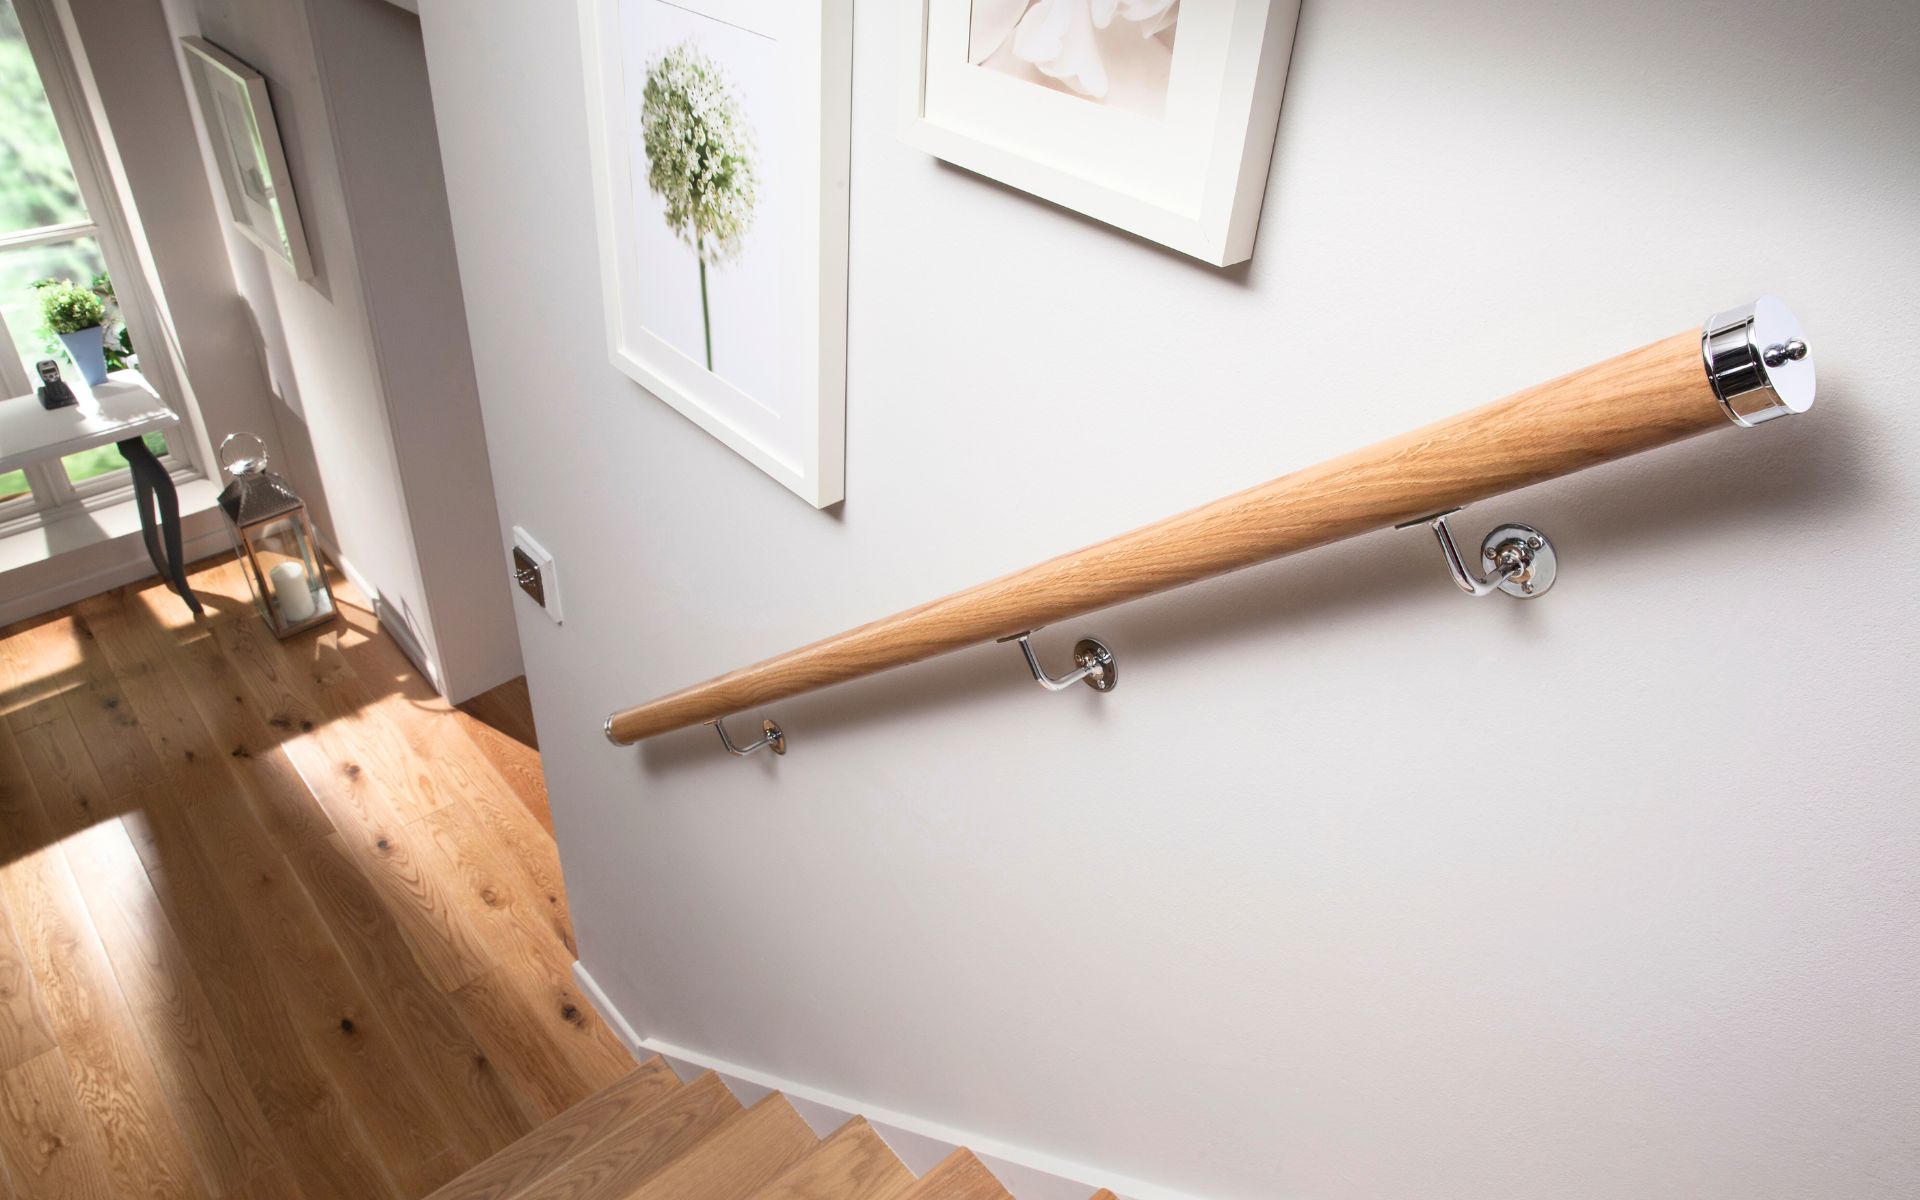
3. Install the Brackets
Next, you will need to install the brackets that will hold the handrail in place. Hold the bracket up to the wall where you marked the location of the stud. Use a drill and screws to attach the bracket to the wall.
4. Attach the Handrail
After the brackets are securely attached to the wall, you can attach the handrail to the brackets. Slide the handrail into the bracket and use screws to secure it in place. Repeat this process for each bracket along the length of the handrail.
5. Sand the Handrail
Once the handrail is securely in place, use sandpaper to smooth out any rough edges or splinters on the wood. This will help to prevent any injuries caused by snagging clothing or getting splinters in hands.
6. Test the Handrail
After installation is complete, test the handrail to make sure it is sturdy and secure. Give it a gentle tug to make sure it can support weight and won’t come loose.
Installing a handrail for your staircase is an important safety measure that can be done relatively easily with the right tools and some basic knowledge. By following these steps, you can have a functional and stylish handrail in your home.
Sure, here’s the continuation of the blog on how to install a staircase handrail.
7. Install Handrail Brackets
Now that the handrail has been cut to size, it’s time to install the brackets. Handrail brackets serve as the supports for the handrail, so it’s essential to install them securely. Measure the distance between the bottom of the handrail and the top of the stair treads. This measurement should be consistent for each bracket.
Use a pencil to mark where each bracket should be installed. Use a level to make sure each bracket is even before you screw them into place. Make sure the screws you use are long enough to go through the drywall and into the wall studs behind it. Repeat the process for each bracket.
8. Attach Handrail to Brackets
Now that the brackets are installed, it’s time to attach the handrail. Slide the handrail onto the brackets and use screws to secure it in place. You can either use wood screws or metal screws, depending on the type of handrail you’re working with.
Make sure the handrail is level as you attach it to each bracket. You can use a level to ensure that the handrail is even. Make sure to tighten the screws securely, but be careful not to over-tighten and strip the screws.
9. Drill the Holes
Once you have the marks, you can start drilling the holes. Use a drill bit that is slightly smaller than the screws you plan to use for the handrail brackets. You want to ensure the holes are deep enough for the screws to be securely anchored into the wall.
10. Install the New Handrail
Now, it’s time to install the new handrail. Here’s how to do it:
- Insert the new handrail into the brackets that you have just installed.
- Secure the handrail in place by drilling pilot holes into the handrail and brackets, and then screwing the handrail into place.
- If your handrail is longer than the brackets, you’ll need to join two sections of the handrail together using a handrail splice. To do this, use a saw to cut the ends of the handrail sections at a 45-degree angle, then insert the splice into the two cut ends and secure it in place with screws.
- Sand the handrail to smooth out any rough edges and ensure it is comfortable to grip.
11. Install the Handrail Brackets
Now you can install the handrail brackets. Align the brackets with the holes you drilled and secure them to the wall with screws. Be sure to use a level to ensure the brackets are straight before you start screwing them in.
Finally, you can attach the handrail to the brackets. The handrail should have pre-drilled holes for the screws, so all you need to do is line it up with the brackets and secure it in place.

Explore our Handrail Bracket
12. Finishing Touches
- Finally, it’s time to add the finishing touches to your new handrail installation:
- Fill any screw holes or gaps with wood filler and allow it to dry.
- Sand the wood filler to ensure it is smooth and flush with the surface.
- Apply a coat of paint or varnish to the handrail to protect the wood and enhance its appearance.
By following these steps, you should now have a brand-new handrail installed on your staircase. Remember to take your time, measure carefully, and use the correct tools and materials to ensure a safe and secure installation.
After you’ve attached the handrail, give it a good once-over to make sure it’s secure and level. You can also add some finishing touches, such as sanding down any rough edges or painting the handrail to match the rest of the staircase.
The final step is to finish the handrail. If you’re working with a wooden handrail, you can sand it and then apply a coat of paint or stain. If you’re working with a metal handrail, you can clean it with a metal cleaner and then apply a coat of paint.
Once the finish has dried, take a step back and admire your handiwork. Your staircase handrail is now installed and ready to provide safety and support for years to come.
Final Thoughts
Installing a staircase handrail may seem like a daunting task but with the right tools and some basic knowledge. Now you know how to install a stair handrail which can be a straightforward DIY project. By following these steps, you can ensure that your handrail is safely and securely attached to your staircase, providing support and safety for years to come.
Thanks for Reading! Forward this article to your friends who want to know how to install handrails.