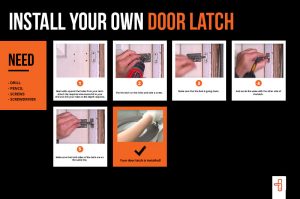
This month is looking like a DIY one…We’re back once again to bring you another step-by-step guide in installing your own floor doorstop, All the tools you will need and steps required to fit a new door latch is explained here.
We like to thank you for joining us again in what is turning out to be Ironmongery DIY Month, considering all the DIY guides we’ve put out this month to help you guys/girls in as many situations as possible! We’d also like to thank Woodie’s TV again for helping us create a more visual guide by providing the images to the about guide.

Things you will need:
– Cordless Screwdriver
– Screws (Provided)
– Pencil (Marker)
1. Open the door to where you would like the door stop to be, then mark with a pencil the location.
2. Using the wood screw provided, screw in the base of the door stop into the floor board.
3. Attach the ‘top part’ of the door stop top complete the job. 1, 2, 3 and it’s done!
If you require a door stopper, we have a selection to choose from here: Door Stopper
For more DIY Guides, and infrequently pleasant updates, please like and follow us on Facebook & Twitter. We are also on Pinterest, with hundreds of DIY pins and projects for you to gain inspiration from.